Harbor Freight 10×12 Greenhouse Construction

Starting Your Own Greenhouse – Home Grown Veggies:

With today’s high gas prices comes high food prices, but that’s not the only problem. Challenging economic conditions can introduce problems in the quality of foods and produce that we consume.
First was the spinach scare, then lettuce, now tomatoes. Fed up, we decide to build an inexpensive harbor freight 10×12 greenhouse to grow all our summertime vegetables; canning any excess for winter consumption.

Greenhouse Construction:

The first step was to  find adequate space. Next was to design the greenhouse shed itself. Finally we would attach a manufactured greenhouse. The idea being that attaching it to a building would add structural strength.

We did a search on the web and found greenhouse prices running several thousand dollars. That cost could make the price of home grown veggies a loosing proposition. Searching further we found one MIC model of greenhouse made by  Harbor Freight, The HFGH 10×12 model 93358 for a mere $599. The price has now jumped to $789. Luckily we managed to get in on an early season sale. If 10 x 12 is too big, try the HFGH 8  x 10 model 93920 for $499.

Google can help you find many good sites that will help you build and modify the Harbor Freight greenhouse. These models seem to have become a DIY cult item for gardeners on a budget.

Here is a link to one blog that shares seven time saving steps in building your HFGH.
It’s a great addition to the sketchy factory provided instructions and is a RECOMMENDED READ.

Progress of our DIY Garden Shed and 10×12 Harbor Freight Greenhouse project.

Garage Shed Foundation – May 30 2008

garden shed foundatin photo

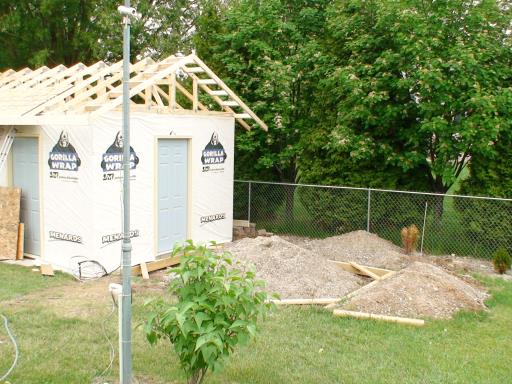
Garden Shed Foundation

Construction begins with town approval and building permit.
Excavation and foundation framing, gravel and re-bar took about 2 hours.
Photo at left shows the 12’x24′ garden shed foundation.
Excavating and concrete was done work by local contractor.
Cost for the concrete slab, about $1800.
Concrete poured and sealed the next day.

Garden shed construction progresses…

garden shed construction progress

Construction in progress

The gravel pile on the south end will eventually become the greenhouse foundation.
The south door will be the entrance for greenhouse.
Framing on the ground is a 4×6 pressure treated timber foundation.
The greenhouse base will be locked in gravel and the framing secured to the shed’s south wall.
As of 3/2014, we’ve had no storm damage (knock on wood).

The garden shed gets a roof.
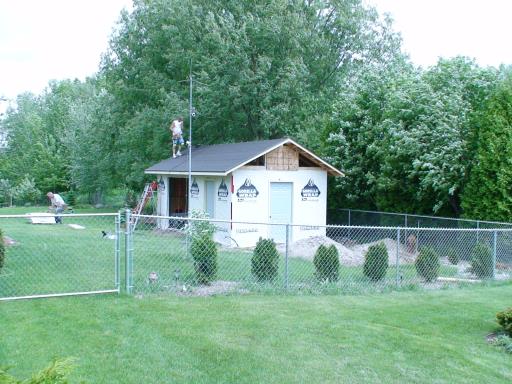
Garden Shed Getting a Roof

Garden Shed Roofing

After just under 30 days of construction, the garden shed is finally taking shape!
Contracted the scary labor out to a local roofing firm.
Cost of labor: about $250, and they were done in 2 hours.
Any price to keep me off the roof.

Secure the Greenhouse to something solid.

greenhouse4

Garden Shed and Greenhouse

The only way to ensure this model will stay standing for year to come is to attach it to another solid building. The greenhouse is shown attached to the south side of the garden shed. The total cost of the shed and greenhouse including concrete work. Roofing and all materials were just under $5000.


June 25 2008: Here is the final project result.

completed Harbor Freight 10x12 Greenhouse project

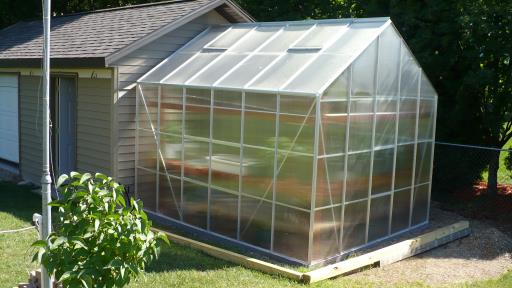
Completed Green House Exterior

The greenhouse is in operation with plenty of growing space. The structure rides out storms very well. This last weekend saw 50 mph winds and hail. No problems whatsoever. This photo also shows how the roof pitch of the greenhouse compares to a standard 6/12 pitch of the shed. It looks better if the two roof pitches match or are at least close. Looks like 7/12 or 8/12 would match well.

Completing the interior with shelving

greenhouse interior shelving

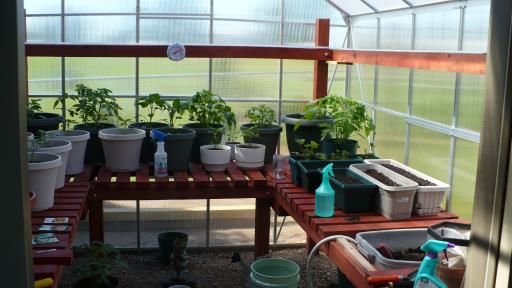
Completed Greenhouse Interior

The inside of the greenhouse features a heavy duty shelving structure made from 4×4 AC2 treated lumber stained a redwood color. The color of the raw lumber was not very appealing and the stain job was worth the effort. Be sure to stain BEFORE the poly carbonate panels are installed or they will become spattered with stain. There is about 32 feet of 32″ wide shelves and the upper support will be for future wire shelving. Do not use lumber shelves above or they will cut out a considerable amount of light.

Safe, Bug Free Veggies:

We can now grow our own vegetables in a controlled, bug free environment that should accelerate production and be a fun hobby for years to come. The next step is to add some basic automation for watering using and Allen Bradley Pico controller and a few relays and dishwasher water solenoids to feed a Misty Mate 17 nozzle patio cooler. We’ll keep you posted as this develops… Have Fun!

Misty Mate Kits of Plant Watering

How Well is It Holding Up?

Follow up: I have been occasionally losing panels during high wind storms. Luckily we have a fully fenced in yard and the panels have always been contained by the fence. For those who have lost panels, I can get 6mm replacement poly carbonate sheeting locally in DePere Wisconsin from the exactly same place Sundance supply gets their poly. I am a dealer for this material. Leave a comment if interested.

Update: As of July 26 2013, my green house is still standing and working great. The panels are slightly yellowed after 5 years of exposure, but it’s mainly from dust and dirt.
The Misty Mate irrigating approach did not work out so well. Our well water has too much dissolved solids that block the spray nozzles. The best approach is to use a small diameter soaker hose instead. Oh, and to keep panels from flying off, I reinforced them with silicone around the perimeter and center, plus added a few extra screws & washers.

Update: May 7 2015 – The green house is still standing a performing well after seven years. No major yellowing other than the accumulation of dirt and a few bugs and leaves. 7 years later and HF is still making this greenhouse: http://www.harborfreight.com/10-ft-x-12-ft-greenhouse-with-4-vents-93358.html buy one, you won’t be disappointed.

Update: June 27 2016 – Even after a rough spring and early summer with many severe storms, no damage at all. However, since I spray a lot of water inside, the base steel appears to be rusting away. Not sure what that will do to the stability, but is doesn’t seem to be going anywhere. I am already planning on what to do in case it does finally fall apart, but until then, we’re still good to go.

If this thing ever does fail, I’ll likely re-use the panels and build a cedar or MicroPro treated wood framed structure, or buy a new one.
This model appears to have a 10 to 12 year lifespan. I suspect a highr price might reflex better quality and longer lasting parts. For the initial price, it was well worth it.


Here are some comparable greenhouse kits available on Amazon:

This article was originally posted on barplan.com

The Final Straw

On April 15th 2018, the Green Bay area received winter storm Evelyn, (or should I say SPRING storm) a storm of the century magnitude ice storm followed by a blizzard dumping up to 29 inches of snow in the area. Here we got about 18′ of wet heavy snow and ice. It proved too much for the aging Harbor Freight Greenhouse to take and it broke her weak back. 

collapsed greenhouse

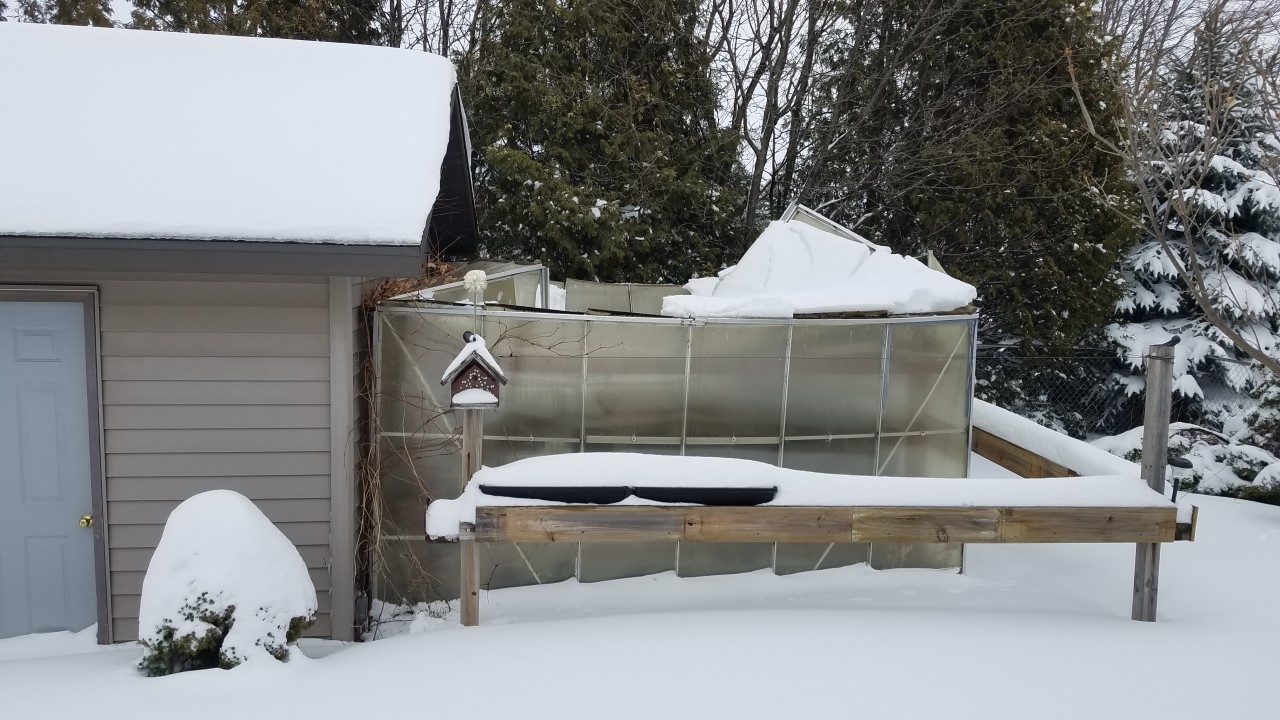
snow load collapses greenhouse

Weak Back?

I say weak because from day one, the kit contained the wrong roof ridge sections and I patched them together with some scrap aluminum. Regardless, I think this storm would have taken out any light structures as it collapsed local hotel and warehouse roofs. She served us well for nearly a decade, enduring many high winds and snow loads; but Evelyn, who shattered records going back to 1905, was the final straw that broken the camel’s back.

Caught on Camera

Two weeks later, the thought came to me; did my security camera catch the collapse? Sure did! Here is the video clip. The collapse happened at 11:49am and 7 seconds. Enjoy.


Microlinx Technologies Available for Amazon Prime